Lubricating your drum brakes, especially the self adjuster mechanism, is an important maintenance task that ensures safe braking and extends the life of your brakes. With a few simple steps and the right lubricant, you can easily lubricate the self adjuster yourself.
Here is a quick overview of the steps:
- Jack up the vehicle and remove the tire to access the brake drum
- Remove the brake drum to expose the brake shoes and self adjuster
- Clean the brake parts with brake cleaner spray
- Apply brake lubricant to the self adjuster, brake shoe ends, and contact points
- Reinstall drum and tire, lower vehicle, and test brakes
Now let’s look at each step in more detail.
Table of Contents
Step-by-Step Guide to Lubricating Self Adjuster Drum Brakes
Safety First
As with any automotive repair task, safety should always come first. Here are some safety tips:
- Use jack stands when lifting the vehicle
- Allow brake parts to cool before handling
- Wear safety glasses and gloves
- Dispose of brake cleaner and lubricant properly
What You’ll Need
Gather the following tools and supplies:
- Floor jack and jack stands
- Lug wrench to remove tire
- Brake cleaner spray
- Shop rags
- High temperature brake lubricant
- Wheel chocks
- Work gloves and safety glasses
Read Also: How to Lubricate Sesame Combination Lock
Step 1 – Lift the Vehicle and Remove the Tire
- Chock the front wheels and release the parking brake.
- Using the floor jack, lift the rear of the vehicle just enough to place jack stands under the frame rails.
- Lower the jack so the vehicle’s weight is fully supported on the stands.
- Remove the rear tire/wheel assembly with the lug wrench.
Step 2 – Remove the Brake Drum
- If you have drum brakes with a self adjuster hole on the bottom, spray brake cleaner into the hole to loosen any debris.
- Locate the brake drum removal hardware – this can be springs, screws or bolts holding the drum onto the axle flange.
- Release any retaining hardware and pull the brake drum off the axle flange. Caution – drums can weigh up to 25 lbs.
Step 3 – Clean the Brake Parts
- Use spray brake cleaner and shop rags to thoroughly clean any brake dust and debris from the brake drums, shoes, hardware and backing plate.
- Take care not to get brake cleaner on rubber brake hoses.
- Tip – rotate and spin the brake assembly while spraying for optimal cleaning.
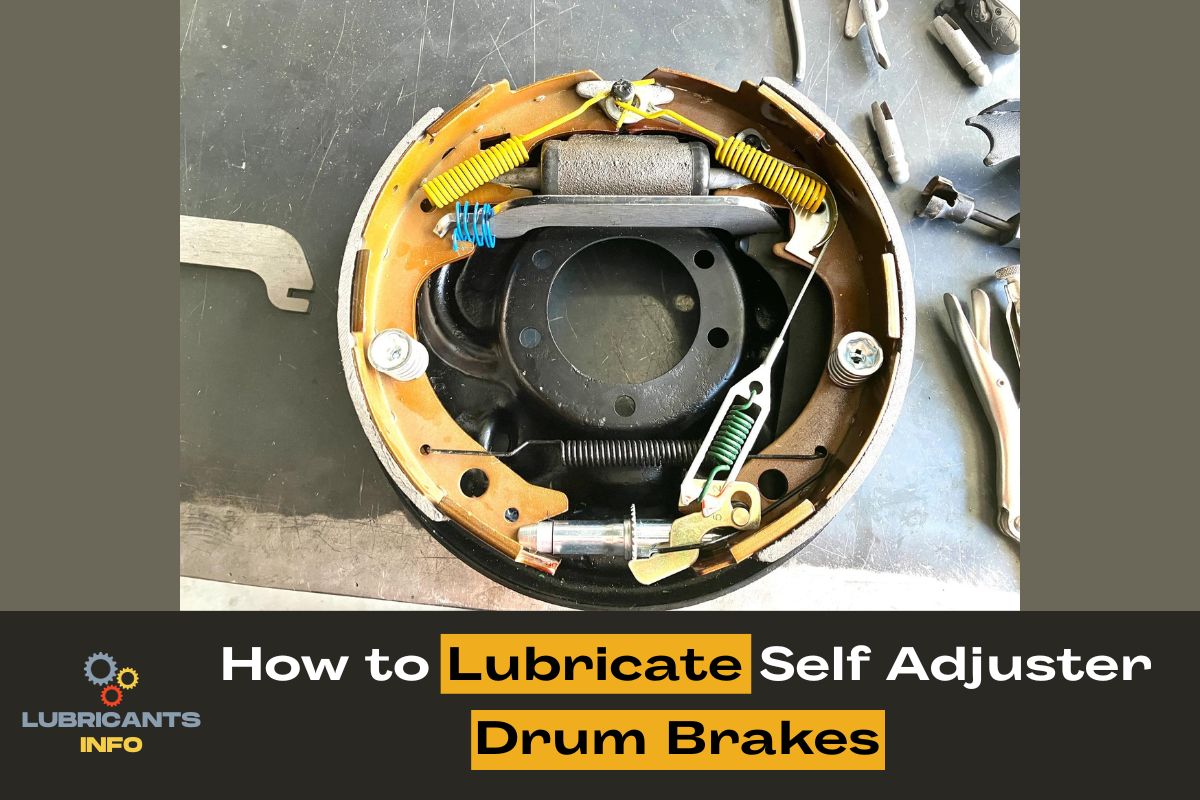
Step 4 – Lubricate the Self Adjuster and Contact Points
- Locate the serrated teeth on each side of the brake self adjuster mechanism.
- Apply high temp brake lubricant liberally to the teeth on both sides.
- Also lubricate the points where the adjuster contacts the brake shoes.
- Allow the lubricant to penetrate for 2-3 minutes before wiping away any excess.
Step 5 – Lubricate the Brake Shoe Ends
- Locate the ends of each brake shoe that contact the interior of the brake drum.
- Apply brake lubricant to the ends of the curved brake shoes.
- Slowly rotate the brake assembly to spread the lubricant evenly on the shoe ends.
Step 6 – Reinstall Brake Drum and Tire/Wheel
- Place the lubricated brake drum back over the axle flange. Make sure it is fully seated.
- Reinstall any springs, screws or bolts to secure the drum in place.
- Install the tire/wheel assembly and hand tighten the lug nuts.
- Lower the vehicle fully and use the lug wrench to tighten the lug nuts to spec.
Step 7 – Test the Brakes
- With the parking brake released, test brake pedal action before moving the vehicle.
- Slowly test drive the vehicle in a safe area, applying the brakes moderately to allow the shoes to seat into place.
- Ensure there are no noises or issues with braking action.
And that’s it! With these steps you can easily lubricate your self adjuster drum brakes for smooth, quiet operation. Be sure to lubricate your brakes at every pad replacement or as recommended by your vehicle manufacturer.
Dos and Don’ts of Lubricating Drum Brakes
Dos
- Use high quality brake lubricant designed for high temperature
- Lubricate the self adjuster teeth liberally
- Allow time for lubricant to soak in before reassembly
- Lubricate the brake shoe ends where they contact the drum
- Follow manufacturer’s recommendation for lubrication frequency
Don’ts
- Use regular chassis grease or multi-purpose grease
- Move or adjust the self adjuster when applying lubricant
- Get lubricant on the brake linings or rotors
- Drive aggressively after lubricating until the shoes fully seat
- Exceed recommended lubrication intervals
Properly lubricating drum brake self adjusters prevents noises, extends brake life, and ensures safe operation. Following the proper dos and don’ts makes the process quick and hassle-free. Consult your vehicle repair manual for exact lubrication procedures.
Frequently Asked Questions
How often should drum brake self adjusters be lubricated?
Drum brake self adjusters should be lubricated at every brake service, or at least once per year or 12,000 miles. Check your vehicle maintenance schedule.
What’s the best lubricant to use on drum brake self adjusters?
Use a high quality brake lubricant designed specifically for brake systems. Avoid regular grease or chassis lube. Popular brands are Valvoline, Lucas and Permatex brake lube.
How do I know when drum brakes need lubrication?
Symptoms like grinding noises, dragging brakes, loose or vibrating pedal can indicate lack of lubrication. Routine lubrication can prevent these issues.
Can I drive the vehicle after lubricating the brakes?
Yes, lubricating the brakes should not prevent you from driving the vehicle. Take care to properly reinstall all brake components before driving.
Are self-adjusting brakes hard to lubricate?
No, drum brake self adjusters are fairly easy to access and lubricate. Much easier than older manual adjusting brakes. Just follow the steps above.
Can I lubricate just the self adjuster and not the shoes?
It’s recommended to lubricate the brake shoe ends where they contact the drum as well when servicing the self adjuster. This provides complete lubrication and prevents noises.
Final Thoughts
Lubricating the self adjuster mechanism and contact points on drum brakes is an easy, but often overlooked service. Without proper lubrication, the self adjuster will stick and fail to keep brakes properly adjusted. Brakes will wear rapidly and potentially cause damage from overheating.
Equipped with the information above, you can now lubricate your drum brake self adjusters properly and with confidence. Just take your time, maintain safety, and refer to your vehicle repair manual for any specific procedures. Properly lubricated drum brakes will lead to miles of safe, trouble-free driving.